As part of my Steampunk Mermaid, I wanted some “mermaid ears”, but I wasn’t a fan of the idea of latex ears for this particular mermaid. I wanted something more stylised.
I had originally planned to create some earrings, to go with the necklace I made (see here), but I decided to go one step further and create some earpieces instead. I loved making these so much, I decided to share how I did it with you!
First off, obviously, you need to collect your bits and pieces together. My findings included ear stud posts with loops, silver chain, silver headpins, 20 gauge wire, 24 gauge wire, Bijoux crystals in two colours and three sizes, and some silver jump rings. My tools were slim flat-nose pliers, wide flat-nose pliers, bent nose pliers, round nose pliers and cutting pliers. All my tools came in a multi-pack from Hobbycraft’s own-brand line, so they’re not exactly top-of-the-range, but for what I do, they are pretty amazing and have lasted me two years without failing.
First off, I removed the crystals from their strings and put them in a holding container. You can use anything you like as this container, but I happened to have a coffee jar lid to hand. Only remove one string of beads at a time, otherwise you can end up with crystals all over the place if you accidentally tip your container or, as is highly likely in my case, a crazy pet (husky) comes to see what you’re up to!

Now, the next few steps are about making headpin and eyepin links. If this is something you already know about, then feel free to skip ahead.
Take a silver headpin and add a crystal. This will either be the bottom of a drop of links, or a stand-alone drop. Make a 90 degree bend in the wire just above the crystal. I like to use my wide-nose pliers and get as close to the crystal as possible, but in this particular project, it doesn’t matter if it’s a bit messy – it looks more organic!

Trim the tail of the headpin to the desired length – this will depend on how big you want your loop to be. My tails ranged from 3/4 of a cm to 1cm, which actually does make a massive difference!

Taking the end of the tail in your round-nose pliers, make a loop in the headpin with the tip of the tail touching the main body of the pin. To do this, I usually use what I call the “pinch-and-shift” method, which I find gives me greater control of the loop. It also allows me to make adjustments to the loop as I go along. I will link to a video showing how I do this at a later date.

To make links, you will need to make eyepins. You can do this using the cut-offs from the tails of the headpin drops, or you can simply cut off the head of a headpin. I personally will only do this if it is absolutely necessary, as it seems wasteful, but go with whatever you feel best. You can also buy pre-started eyepins, but if you only have headpins to hand, this is the way to make them.
Taking an off-cut or your de-headed headpin, make a loop on one end. I use the “twist” method for this point because it’s quicker. Once you have created your loop, bend the tail away from the loop to create a neat pin.

Add your crystal/s and create the second loop on the other end as you would for a regular headpin. If the loops aren’t properly aligned, hold one end with your wide-nose pliers and gently twist the other with your slim or bent-nose pliers.

Make as many of these links and pins as you like. For this project, I decided to make a random assortment of them using a combination of single and multi-crystal pins, and then lay them out in a design that I liked afterward. It felt more random and natural that way, but if you like, you can work to a pre-drawn design or set pattern.

Once you have all the links you want, you can start putting them together. Link them together by opening the “eyes” in the same way you would a jump ring – by twisting them open sideways instead of pulling the loop open. Add your link and close the “eye” again.

Add your links together in the same way until you have a string in the length you want. I made three lengths and had three single drops left over.

You’re done with the lengths! Put these somewhere safe – I pinned them to my mannequin as my dog has a habit of inspecting my desk!

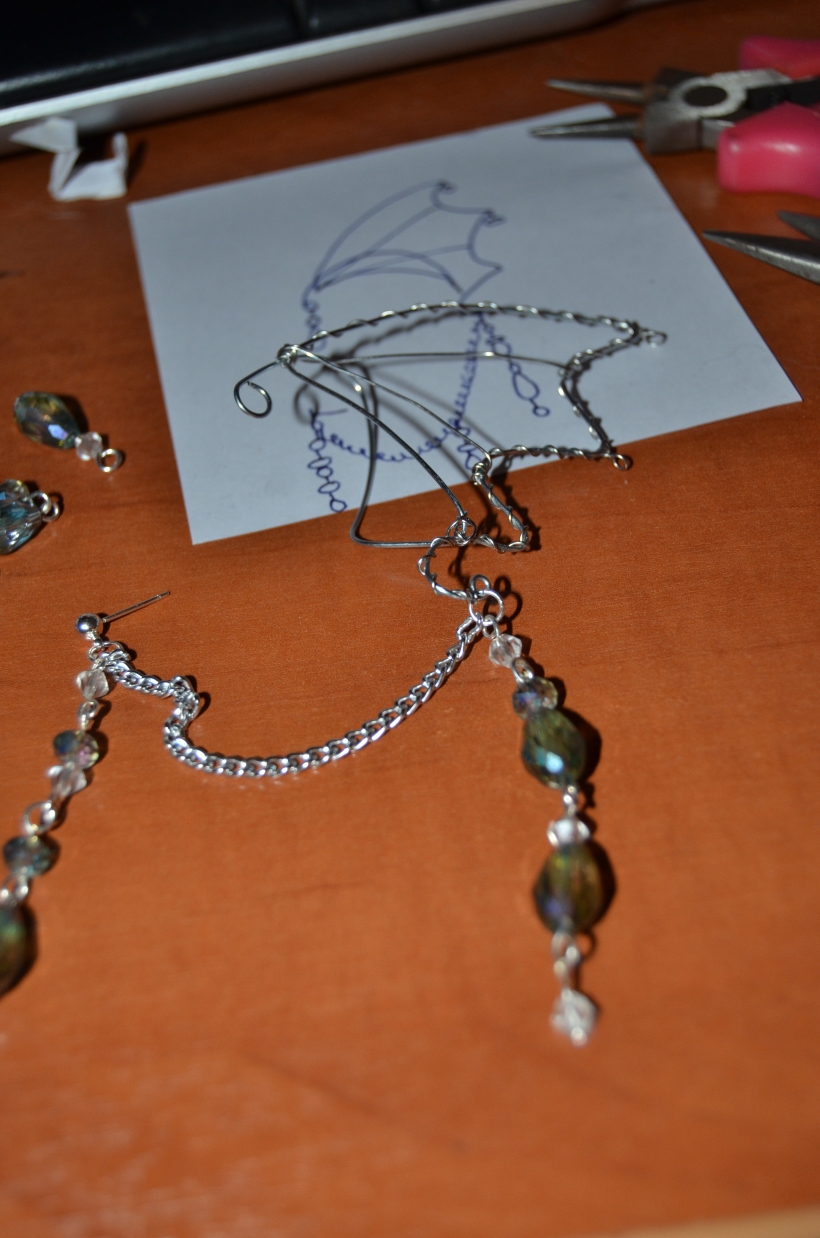
I also took this opportunity to draw out how I intended to lay the lengths out on the main earpiece – you don’t have to do this, but I have a specific place in mind for each of these lengths, and my memory is terrible!

Next, I worked on the ear cuff. To start, I cut a piece of 20 gauge wire – I judged this by eye mostly, as I worked to what I thought would fit my ear, but in the end, my piece was approximately 13″ long. Coil a large loop on one end with your pliers.

Moulding around your ear, and locating the loop at the crux of the helix, create an arch around the back of your ear. Once the wire reaches far enough round the back of your ear (I didn’t need mine to go very far, about half way down), bend the wire towards the back of your head (around 90 degrees) and curl it slightly forwards, following the shape of the cartilage of your ear.

Bend the tail of the wire so that it passes across the front of your ear, angled slightly upwards toward where your ear meets your head. When it meets the end of the wire near the curl, bend the tail upwards again. This tail can then be shaped into your desired “ear”. I made mine to resemble the traditional mermaid ears, shaped like fins, and finishing with a small loop at the end of the tail (not pictured below, but can be seen in the next images). Shape the wire around your ear until it feels reasonably secure and comfortable. This can take a while, especially if you are moulding them around your own ears.

Next I cut a long length of 24 gauge wire for securing and wrapping the piece. I mostly guessed at the length of this, as it depends on how you want to wrap your piece, but make it at least the same length as the 20 gauge wire (at least 13″ in my case, but I cut mine significantly longer, as you can see).

Start at the front edge of the earpiece, wrap one end of the 24g wire around the starting end of the 20g wire and the bend in the front of the earpiece – this will secure the wire sections together and help the earpiece to keep it’s shape. Wrap approximately 4 times and pull tightly to secure. Press the short “raw” end of the wire as close to the earpiece as possible, trimming it if necessary. Do not cut the long end yet!

Wrap the long tail end of the wire around the ear shape in a spiral. I like to make these fairly closely spaced, but you can make them as closely or as loosely wrapped as you like. Make sure that you pull the 24g wire tightly around the 20g wire as you go, otherwise the thinner wire will move around on the large wire. At the top and second “wing”-tip, I left two larger loops of wire, before carrying on. Where the bottom of the third “wing”-tip met the back of the ear bar, I wrapped the 24g wire around them both a couple of times to secure the pieces together, before continuing the wrapping to the end of the lower loop. Once I met the loop, I wrapped a couple of times around the 20g wire to finish it off and clipped the tail close to the wire, pressing the tail down and filing rough edges where necessary. At this point it is worth trying the earpiece on and reshaping it if necessary, as the pressing and pulling against the wire can cause it to become deformed.

Remember those two large loops I left at the tips of the “wings”? To secure those in place, simply twist them in the opposite direction to your spiralling on the large wire. For example, if like me you were wrapping the 24g wire from left to right (with the two loops closest to you), you would twist the large loops in a clockwise direction. This tightens the loops around the wire and gives you somewhere to hang some crystal drops!


That’s the main shape of the earpiece done!
Next, cut a piece of chain to the desired length. Mine is about 3″ long.
Attach a jump ring to each end of the chain, and an ear stud to one of the jump rings.

Attach the free end of the chain to the small loop on the earpiece using the jump ring.
From here, you can simply have fun with decorating your piece! I followed my drawing and attached the links in a set pattern, you can make it up as you go along if you wish.
Try it on again to make sure everything hangs comfortably, and make any adjustments you think necessary. Repeat for the second earpiece – I actually found the second one harder to make, as I was trying to get it as close as I could size and style-wise to the first!
And that’s it; that’s how I made my mermaid earpieces!
